Hexo and Obsidian, Making Personal Blog Writing More Elegant and Efficient

1. Introduction to Hexo and Obsidian
1.1 Hexo
Hexo is a fast, secure, easy-to-use, and highly customizable static blog generator.
- Fast: Hexo generates static pages that load very quickly.
- Secure: Since Hexo generates static pages, it is more secure compared to dynamic blogging systems, with no SQL injection or other vulnerabilities.
- Multiple theme support: Hexo has many themes to choose from and allows for custom themes and styles.
- Rich plugin library: Hexo has many plugins available, such as Google Analytics integration and comment systems.
- Easy to backup and migrate: Because Hexo generates static pages, backup and migration are straightforward.
Hexo’s official website
1.2 Common Commands for Hexo
The most commonly used commands are:
hexo cleanhexo g && hexo shexo s -s, add-sparameter to serve static files only.hexo clean && hexo g && hexo d
1.3 Obsidian - A Second Brain, For You, Forever.
In short, Obsidian is a cross-platform note-taking application that supports the Markdown format and has powerful bidirectional linking functionality. Obsidian’s official website
Obsidian has the following advantages:
- Local offline support: The file format is standardized Markdown files, making it easy to share and sync across multiple devices.
- Bidirectional linking functionality
- Plugin support
1.4 Hexo + Obsidian
Hexo and Obsidian are two excellent tools that can be used in combination to bring a more elegant and efficient experience to personal blog writing. Hexo is a static blog generator that allows for quick creation and deployment of blogs to the cloud, as well as customization through various themes and plugins. Obsidian, on the other hand, is a personal knowledge management tool that helps users organize and manage notes, and supports cross-document linking and chart display functions.
By using Hexo and Obsidian together, we can write blog posts in Obsidian and use Hexo to generate them into static pages and automatically deploy them to the cloud. Additionally, Hexo provides a variety of themes and plugins that can be customized to meet individual needs for a more beautiful blog interface and additional functionality.
2. How to Configure Hexo in a Elegant Way
2.1 Blog Post Links - A New Persistent Solution
Hexo’s default article links use a date-based classification similar to :year/:mouth/:day/:title. Although the title can improve SEO efficiency, some people may not like this type of article link.
It is recommended to configure the plugin: hexo-abbrlink, the plugin Github repository address.
Install the plugin:
npm install hexo-abbrlink --save |
Modify Hexo’s config.yml configuration file:
permalink: posts/:abbrlink.html |
The abbrlink property value will be automatically added to the post’s Front-matter created by hexo new command:
--- |
The final effect is similar to: https://itreefly.com/posts/da7d68b5.html.
It is concise and neat. At the same time, the initialized abbrlink can be manually modified, and with the help of Obsidian plugins, more creativity can be achieved, which will be described in detail later.
2.2 Blog Image Management - A New Solution
Hexo’s native image management uses tag plugin syntax:
{% asset_img image_name.jpg This is an image %} |
Due to this syntax, it is not friendly to software such as Obsidian, Typora, Visual Studio Code, etc. and is not recommended!
The elegant solution is still to manage images and other resources in Markdown format, and use Hexo plugins to automatically fix image paths when executing the hexo g command and generate static web pages.
We recommend installing the hexo-image-link plugin, plugin Github address.
Plugin installation method:
npm install hexo-image-link --save |
Modify Hexo’s config.yml configuration file:
hexo-asset-folder: true |
By turning on the hexo-asset-folder option, executing hexo new post_title will create both:
- MD file:
post_title.md - Folder with the same name:
post_title
Copy the local images of the article to the folder which has the same name, and insert a relative path image short link in the article using Markdown syntax, which can be displayed and edited correctly in third-party software such as Obsidian, Typora, Visual Studio Code, etc.
Markdown syntax:
! [ Alt text of the image ] ( post_title/images-1.png ) |
The benefits of this approach are:
- Convenient management of articles and attachments;
- Correct display of images in third-party editing software;
- Perfect support for Hexo to generate static web pages.
2.3 Thumbnail Images Path Issue - Cover and Thumbnail
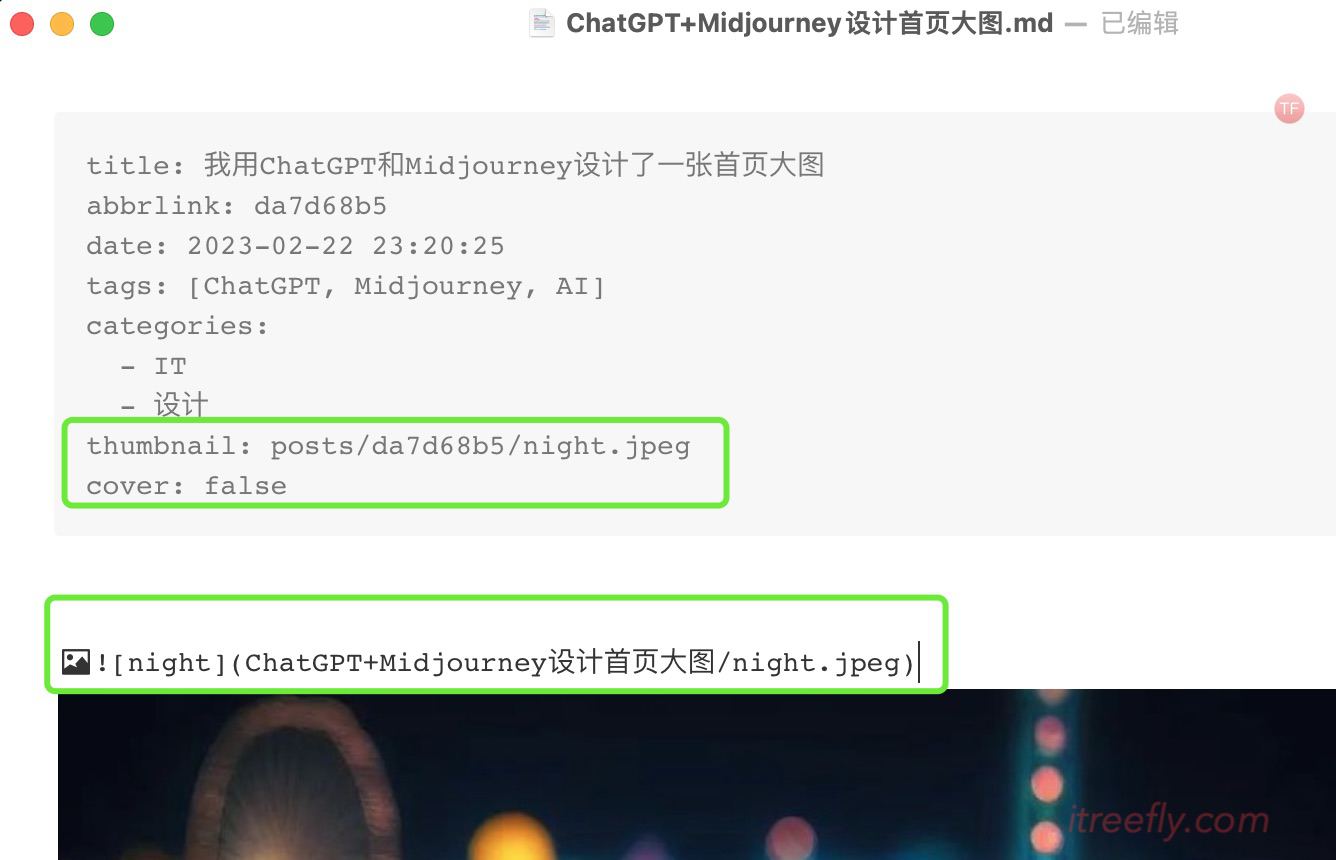
Some themes have enabled the article cover and thumbnail feature, and here we mainly discuss the path issue.
For example, in the Redefine theme, the Front-matter of an article provides thumbnail and cover parameters.
Setting false can disable this feature, while setting a URL link for the image can display it on the homepage and after the title in the article. Here is a method to solve the image path issue in Front-matter for your reference:
Something you need to know:
- The path for thumbnail or cover images uses the URL path of the static image produced by Hexo, which is located in the
publicdirectory at the corresponding path of the image in the article, such asposts/da7d68b5/night.jpg. abbrlinkandnight.jpegare already known.- This is a different method from using images in an article and can be used as a reference for solving image path issues in Front-matter.
3. Hexo and Obsidian: The Perfect Combination for Improving Writing Efficiency
3.1 Changing the Way New Posts are Created - Replacing hexo new
The correct way to start writing a blog, in my opinion, is to open Obsidian rather than starting the command line and typing hexo new title!
To improve writing efficiency, there are a few things you can do. Take your time, sharpen your tools before chopping wood, and take a break with a cup of coffee ☕️:
- Set the local repository of Obsidian to the
sourcefolder of Hexo. - Create a
Templatefolder in the_draftsdirectory to store template files, and aDraftsfolder as the location for new posts. - Install the third-party template plugin Templater, and configure the
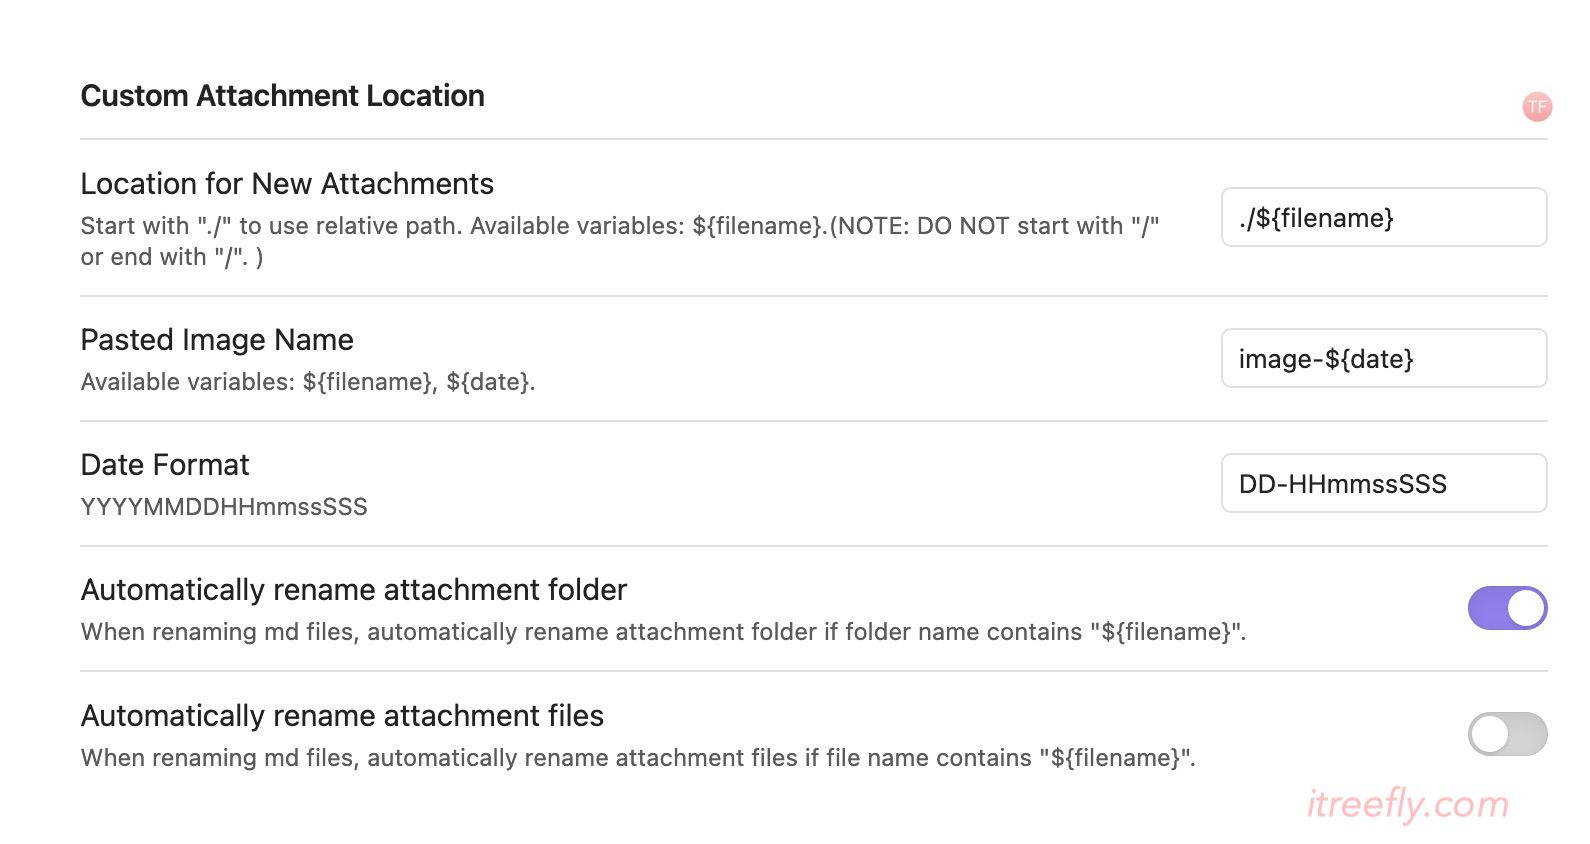
abbrlinkgeneration function. - Install the third-party article attachment management plugin Custom Attachment Location and set the path for storing article images.
- Test the method of creating a new post and execute the first template command, and then pasting the first image from the clipboard.
(1). Set up local repository in Obsidian
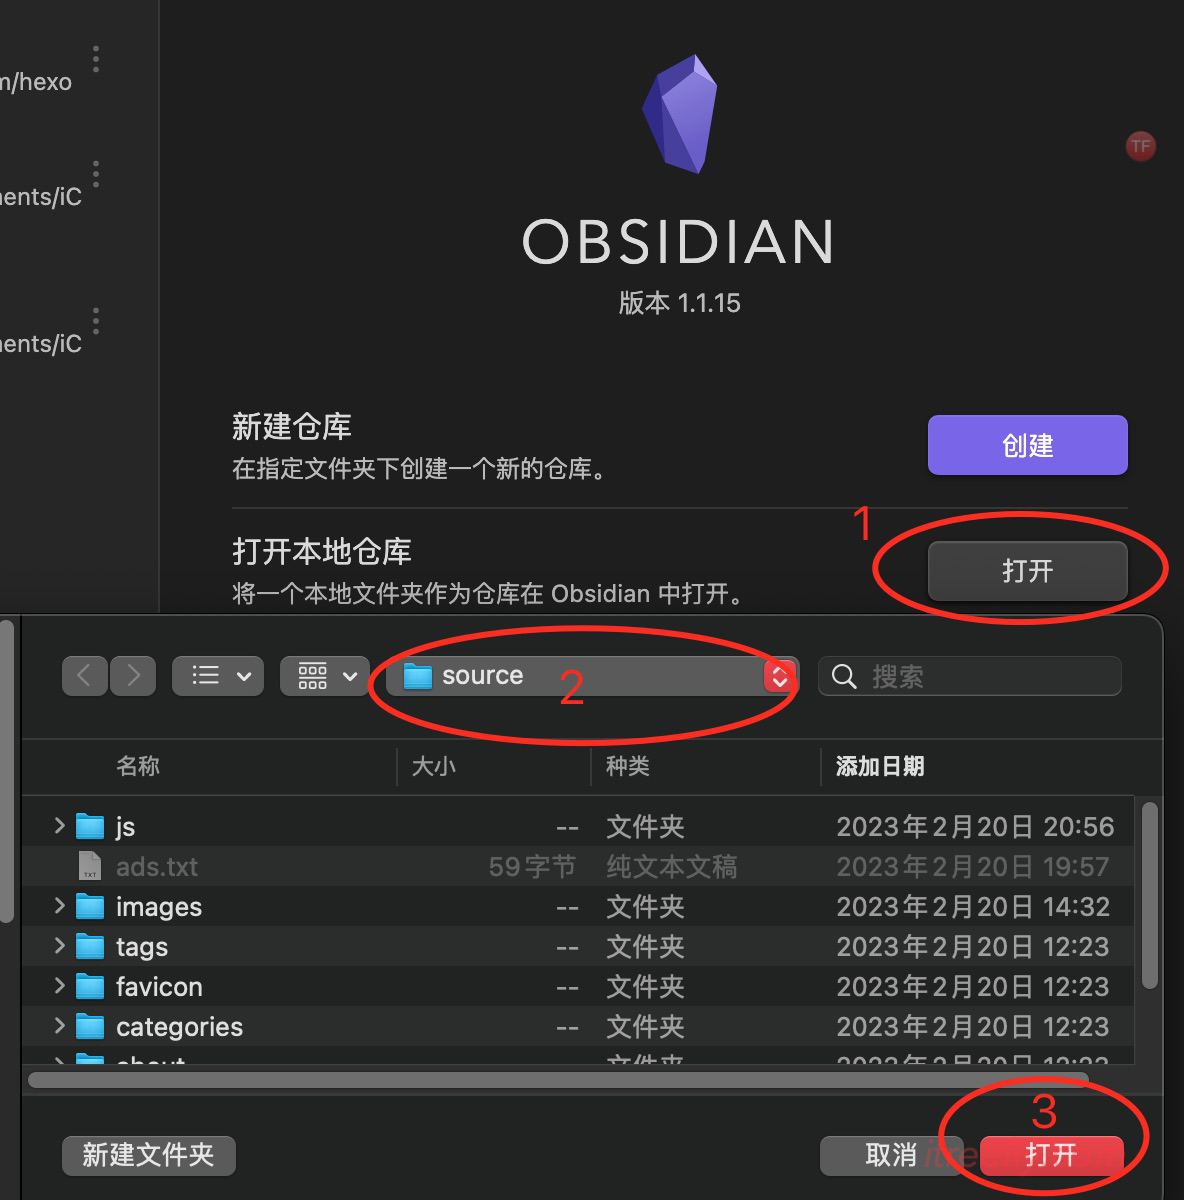
[!NOTE]
I would recommend excluding all files except for the_postsand_draftsfolders.

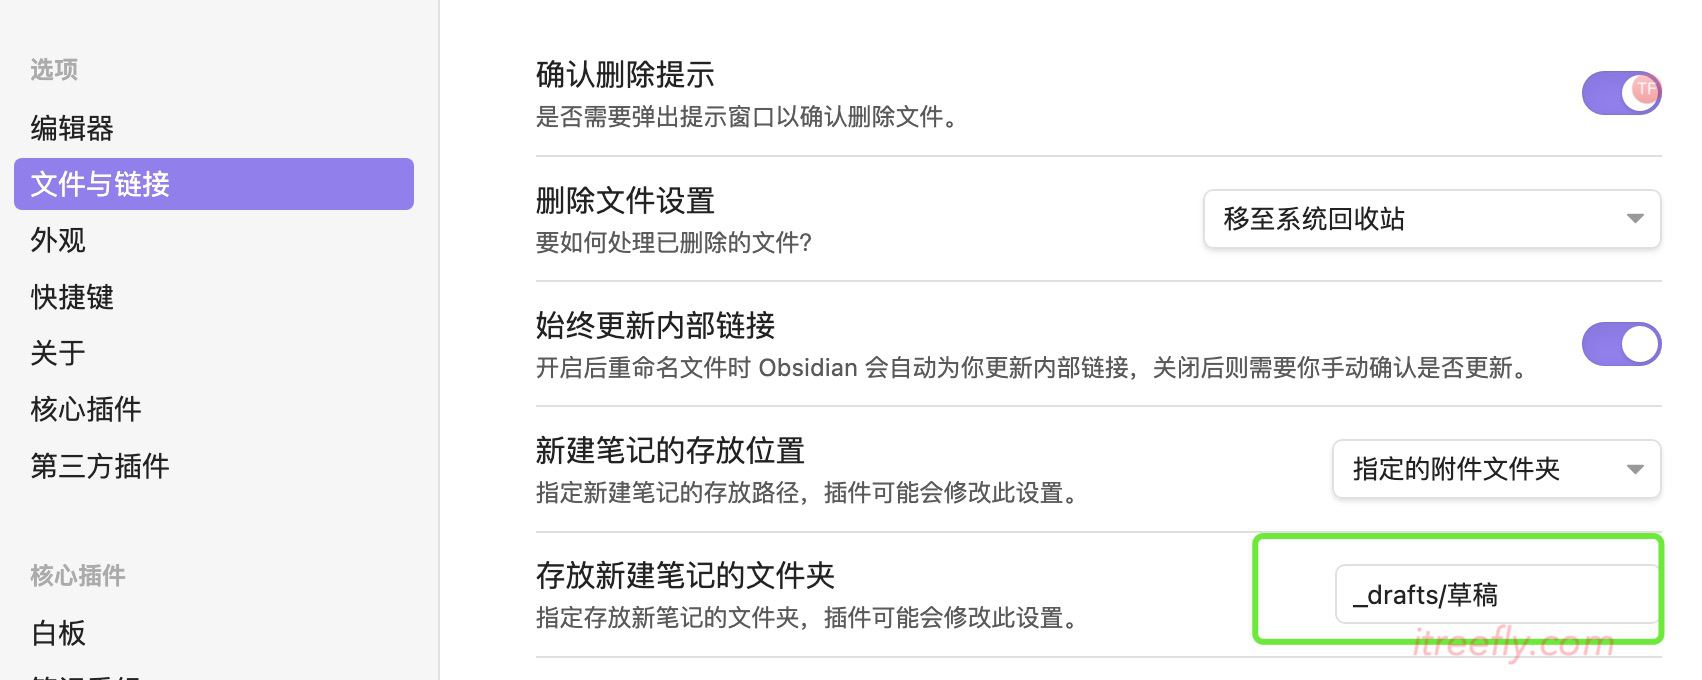
(2). Set up the location for storing newly created posts
Create a “Drafts” (草稿) folder under the _drafts directory.
Open the Settings of Obsidian, and set up the location for storing newly created posts.
(3). Install the Templater plugin and configure the abbrlink generation function
After installing the third-party Templater plugin, set the custom template storage path to _drafts/Template.

Next, create a tp-hexo-post-init file in the Template folder, either manually or by using the command line. Make sure to create it in the correct directory:
touch tp-hexo-post-init |
This tp-hexo-post-init file is used to save the template content of Front-matter. Copy and paste the following code into the file and save it.
--- |
[!NOTE]
Note: It is not recommended to use.mdas the file extension for template files, as thehexo gcommand will attempt to process.mdfiles in the_draftsfolder, which may cause the command line to print error messages as the Templater syntax cannot be recognized.
How to set up a custom function in Templater - method 1: call a system command
The above code uses a custom function to generate an 8-character hexadecimal string, which is similar to the function of hexo new. To create the custom function tp.user.hash_8c() for generating abbrlinks, open the Templater plugin configuration interface and click the “Add New User Function” button.
Fill in the following information as shown in the picture:
- Function name:
hash_8c - Function body:
md5 -q -s $s | cut -c 3-10

The above test environment is based on macOS, and for Windows, you can use a script to create it.
How to set up a custom function in Templater - method 2: calling a custom script function
For the sake of system compatibility, you can try the second method, which is to write a custom script function.
First, create a “Scripts” folder under the _drafts folder, and set it as the directory for storing Templater custom script files.
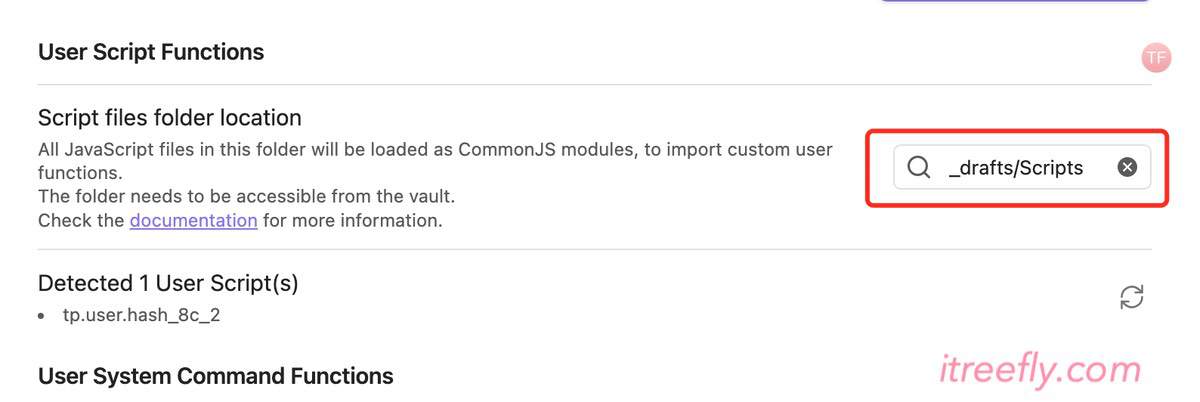
Then, create a new JavaScript file in the Scripts folder named hash_8c_2.js and paste in the following code:
/* |
Remember to change function name in the tp-hexo-post-init file to: tp.user.hash_8c_2(date)
--- |
For details on how to write custom scripts, see the Templater documentation Define a Script User Function.
(4). Install the Custom Attachment Location plugin and complete the setup
[!NOTE] Note: The reasons for choosing this plug-in are as follows:
- Automatically create a folder with the same name as the post, and rename the folder when the post is renamed
- When inserting an external image or pasting an image from the clipboard into a post, a copy of the image is automatically saved in the same folder with a custom image name
- Use relative paths to insert Markdown format images
Some settings that need to be customized:
Set the first parameter to ./${filename}, and set the image name and date format according to your preferences. Remember to enable the auto-rename folder feature.
(5). Test the Template and Insert Image Function
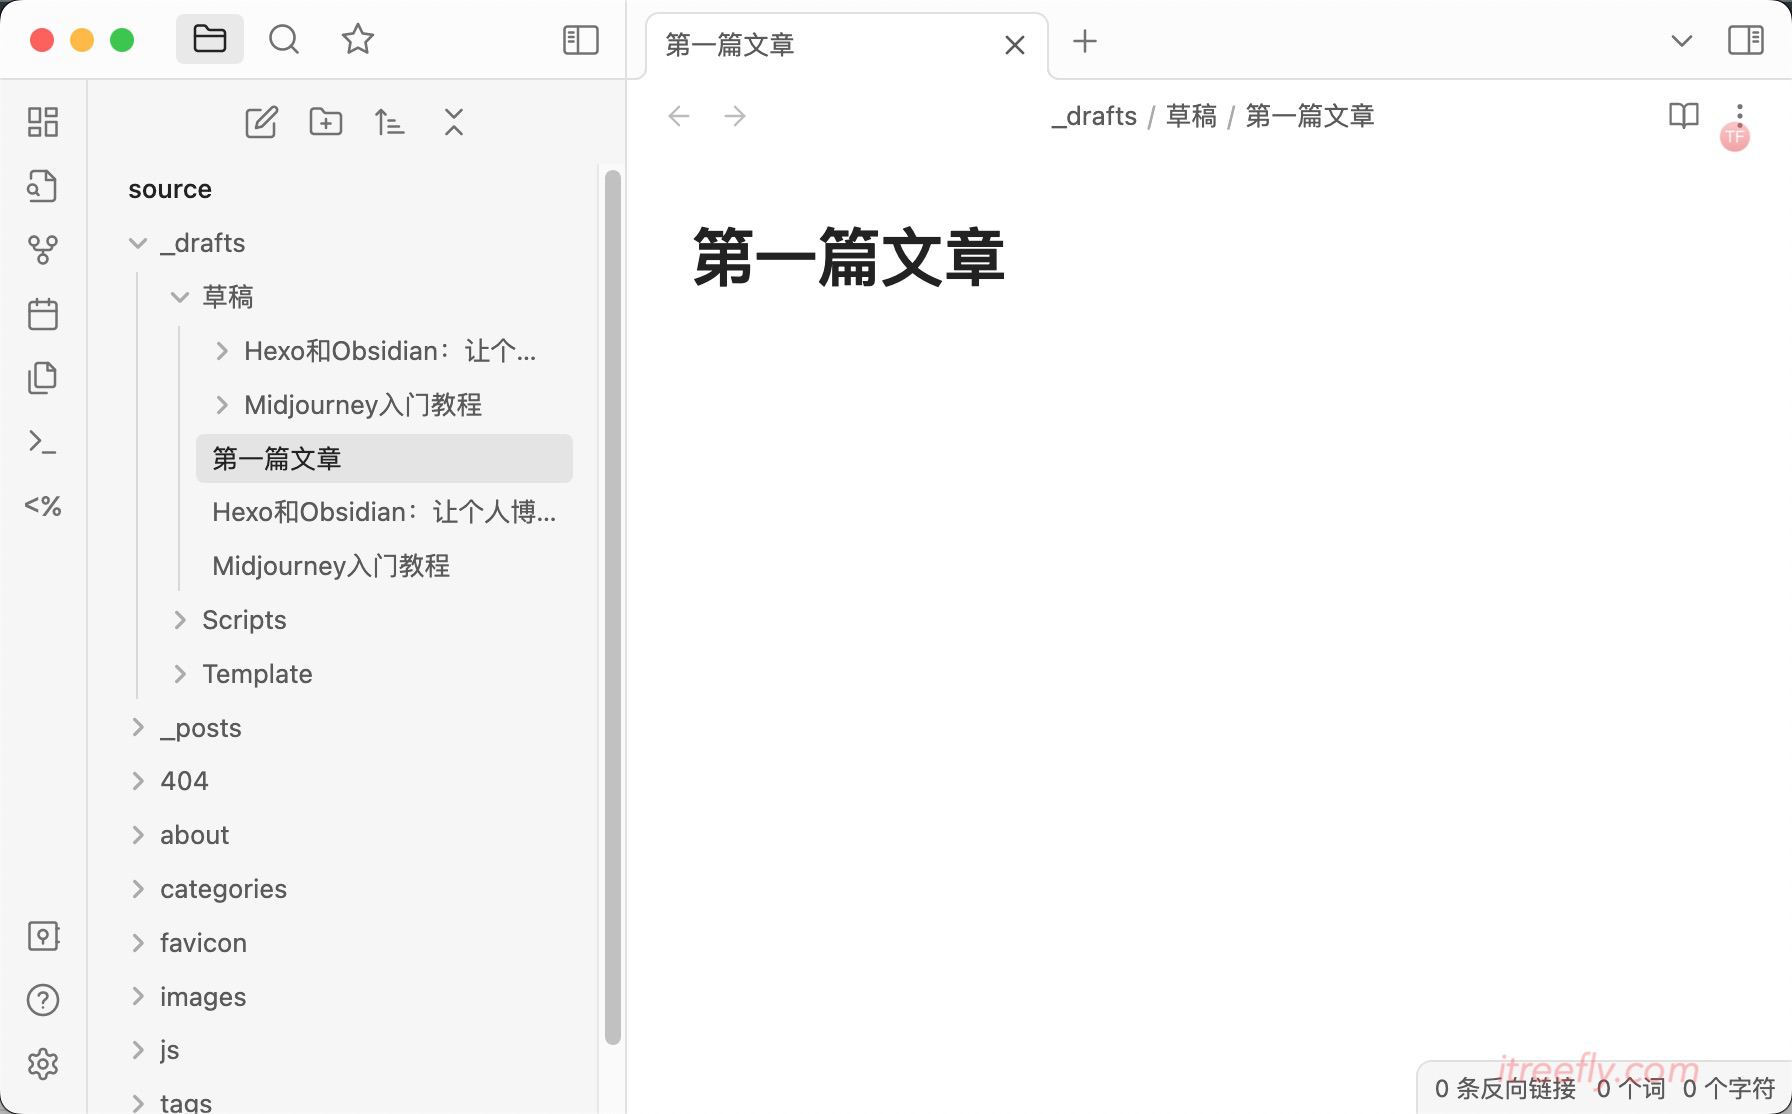
1) Click “New Note” to create a new post, name it “First Article”, and it will automatically be saved to the Drafts folder.
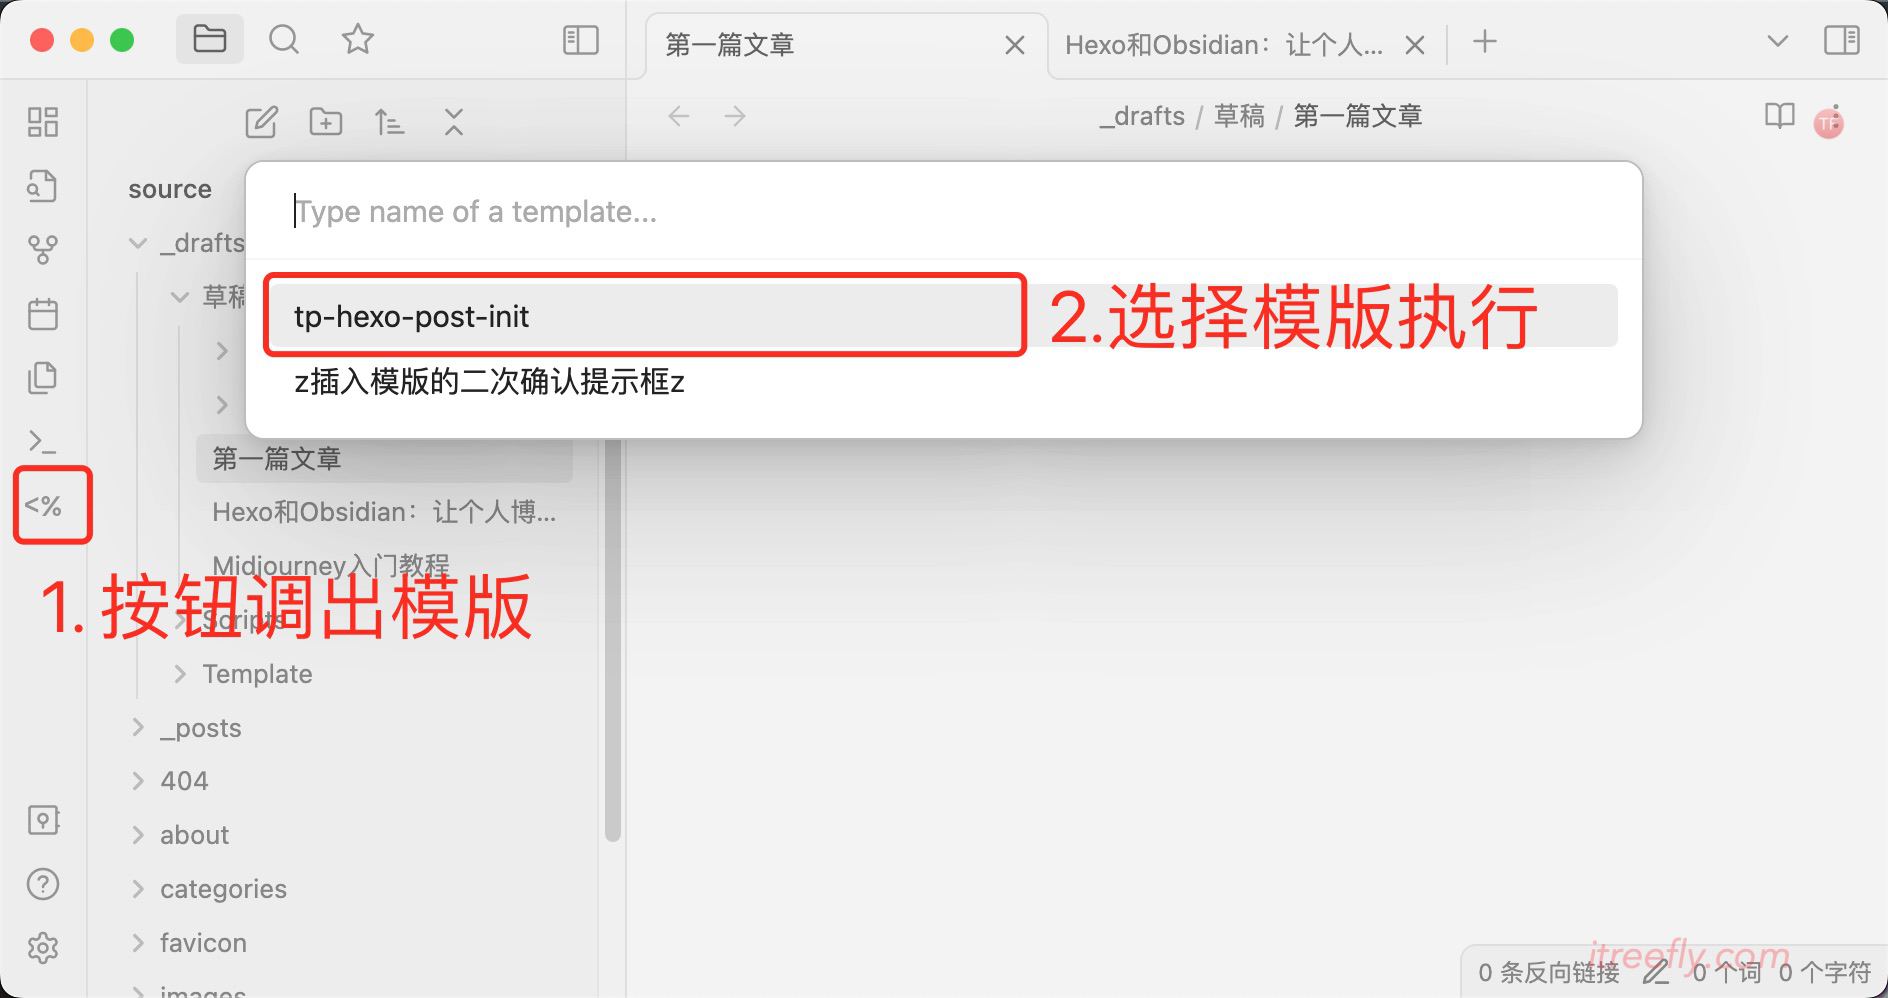
2) Execute the template command.
Click the shortcut button for templates on the left side of the Obsidian, and select the template file you just created from the template list.
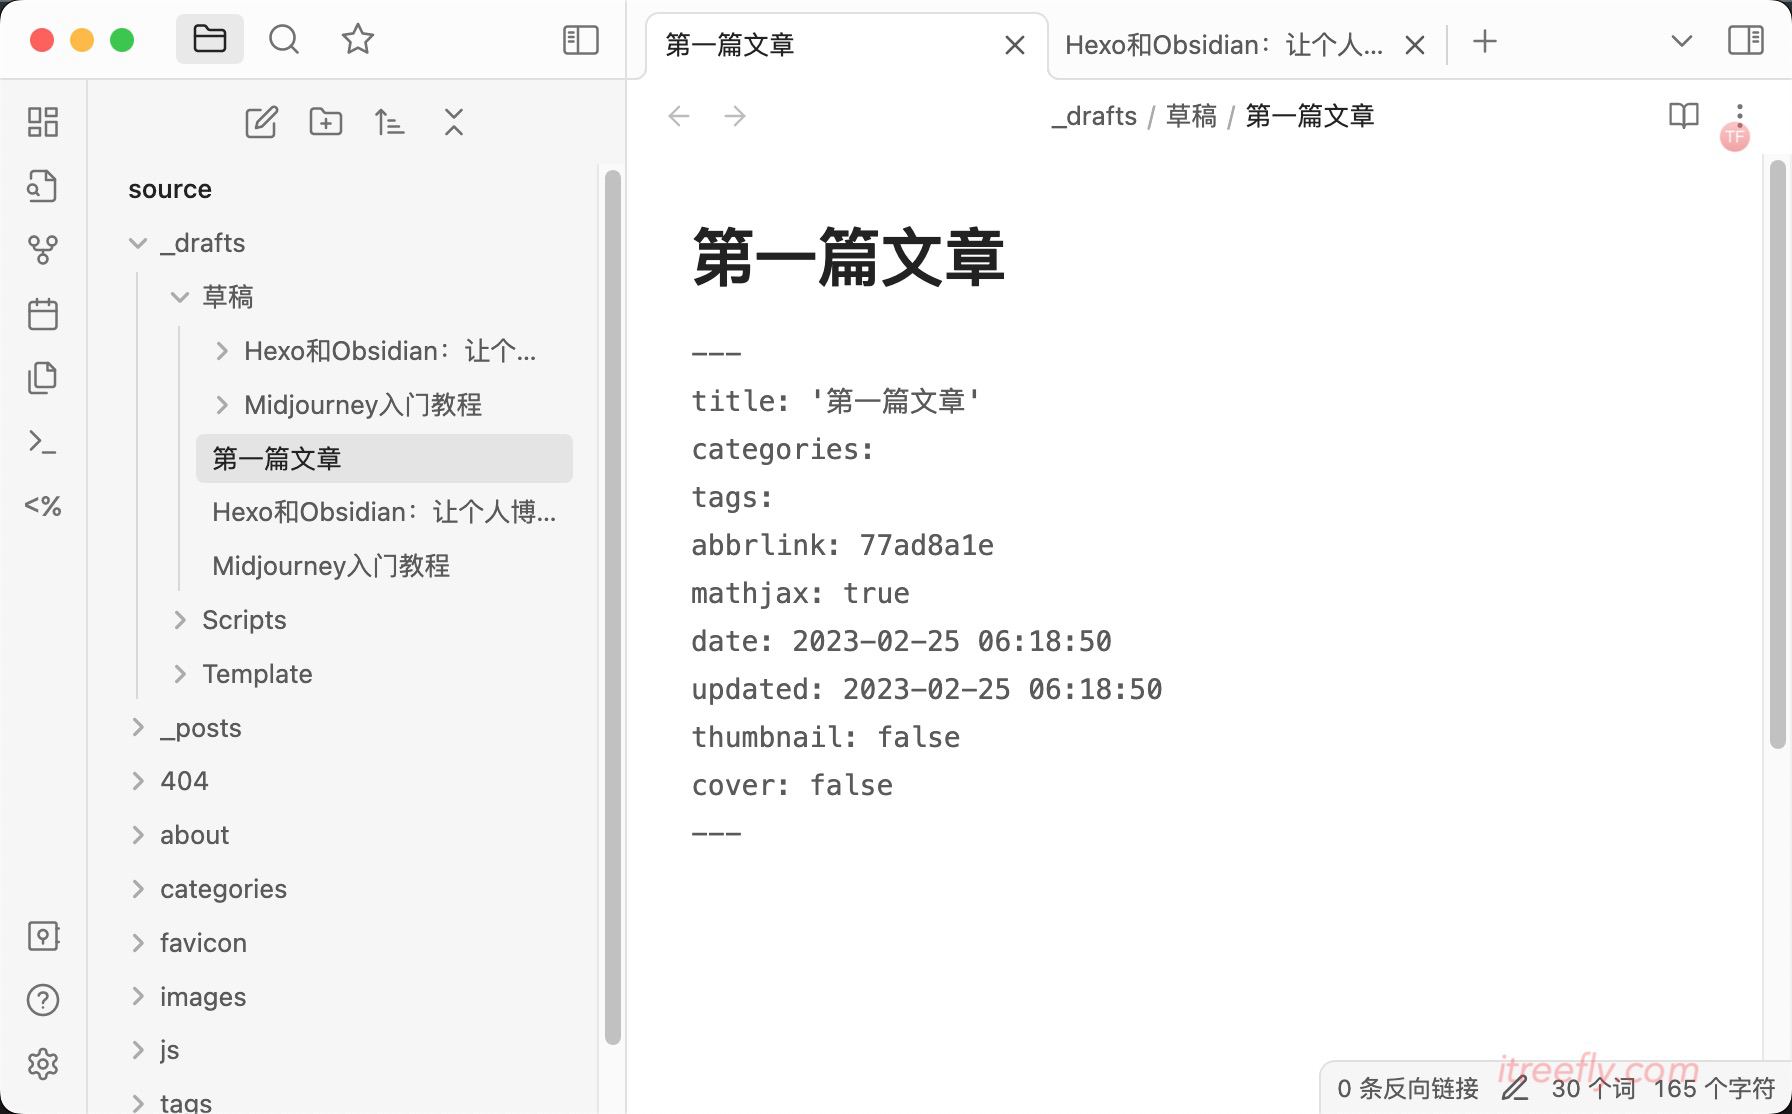
3) The Front-matter is generated automatically, with the correct date and abbrlink format.
4) Paste the image from the clipboard into the post, which will automatically create a folder with the same name of the post and save the image with a formatted name.
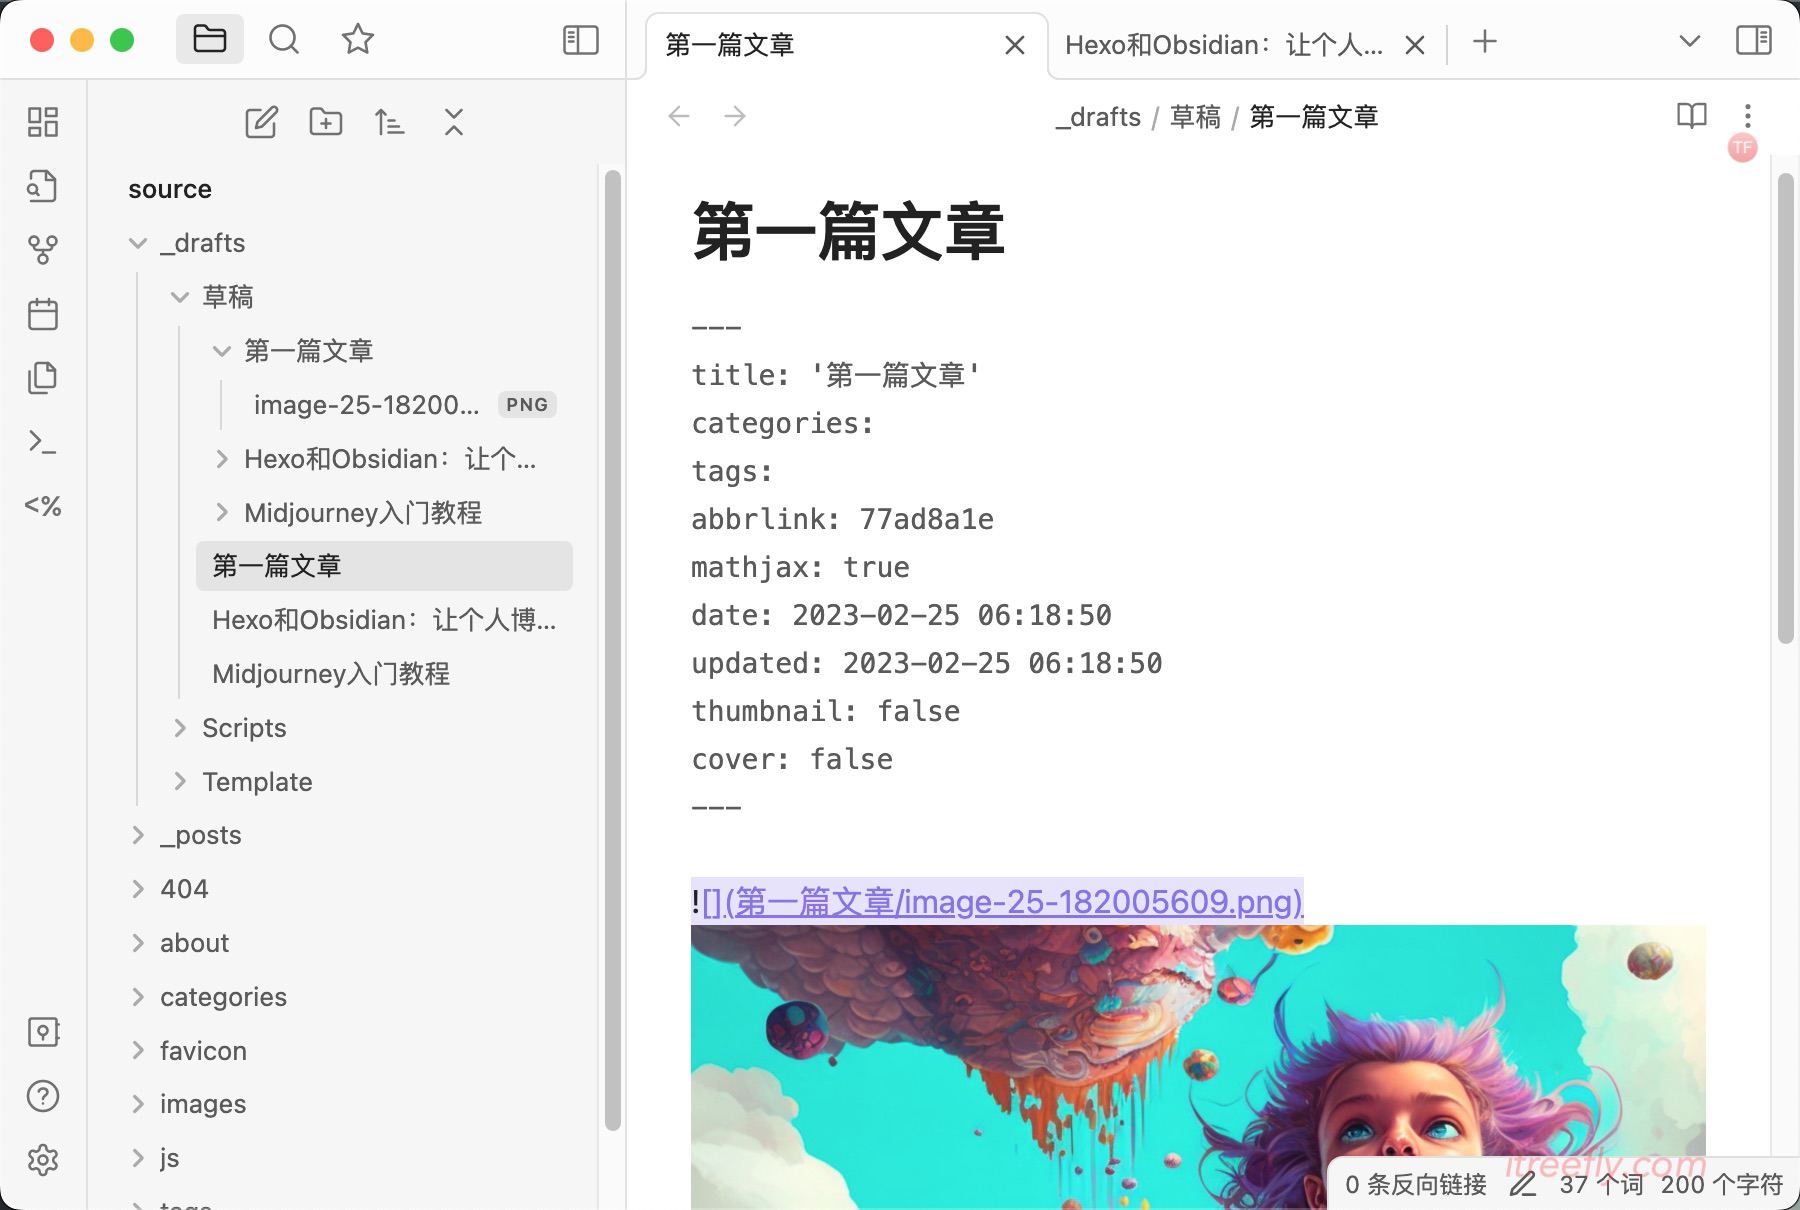
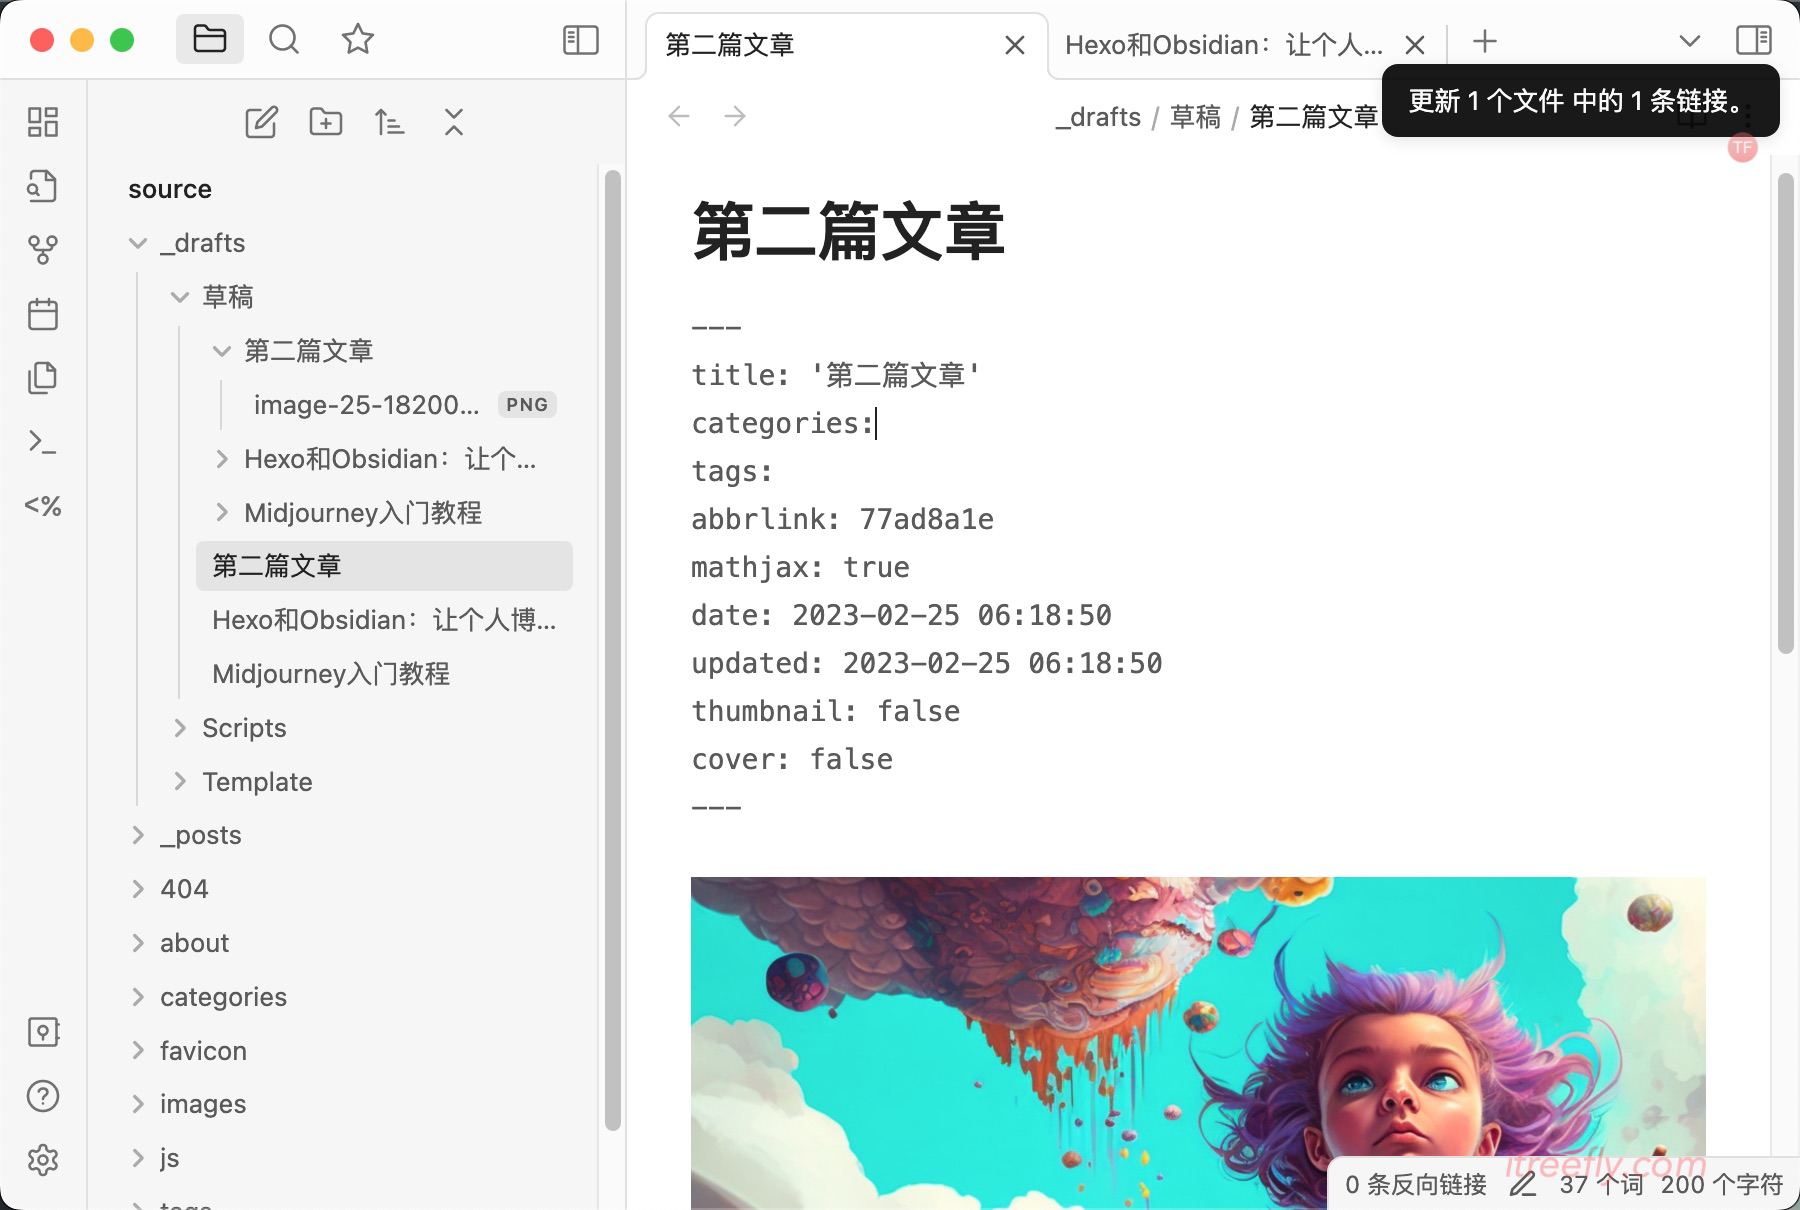
5) After renaming the post title, the folder is renamed accordingly, and the links in the post are updated automatically.
Change the post title to ‘Second Article’, and save it. The attachment folder is renamed accordingly, and the markdown links are updated automatically.
(6). After the draft is completed, copy the post (which with .md suffix) and its same name attachment folder to the corresponding category directory in _posts, and publish it.
4.Hexo and Obsidian: How to Customize and Configure Advanced Features
To be continued.

tree_fly
itreefly@hotmail.com
2023-02-28
- 标题: Hexo and Obsidian, Making Personal Blog Writing More Elegant and Efficient
- 作者: tree_fly
- 创建于 : 2023-02-28 12:12:57
- 更新于 : 2023-02-28 12:12:57
- 链接: https://itreefly.com/posts/3811ca10.html
- 版权声明: 本文章采用 CC BY-NC-SA 4.0 进行许可。